
 Shipping
Shipping: Blockout Dates
Block specific dates (or date ranges) from the shipping calendar. Prevent customers from selecting holidays, closed days, or unavailable dates for shipping.
Table of Contents
- What Blockout Dates Do
- Step-by-Step Configuration
- Managing Blocked Dates
- Common Use Cases
- Troubleshooting
- Quick Reference
What Blockout Dates Do
What this feature does:
- Prevents selection of specific calendar dates
- Allows you to block holidays (e.g., Christmas, New Year)
- Allows blocking of temporary closures
- Sets maximum advance booking window (how far ahead customers can book)
- Supports blocking entire days or specific time ranges
What this feature does NOT do:
- Does not set preparation time or lead time (configured separately in Preparation Times)
- Does not control operating hours or time slots (configured separately in Configure Availability)
- Does not automatically reschedule orders — customers simply cannot select blocked dates
Step-by-Step Configuration
Step 1: Access Blockout Date Settings
- Go to Bird Settings > Shipping
- Scroll to the Blockout dates section
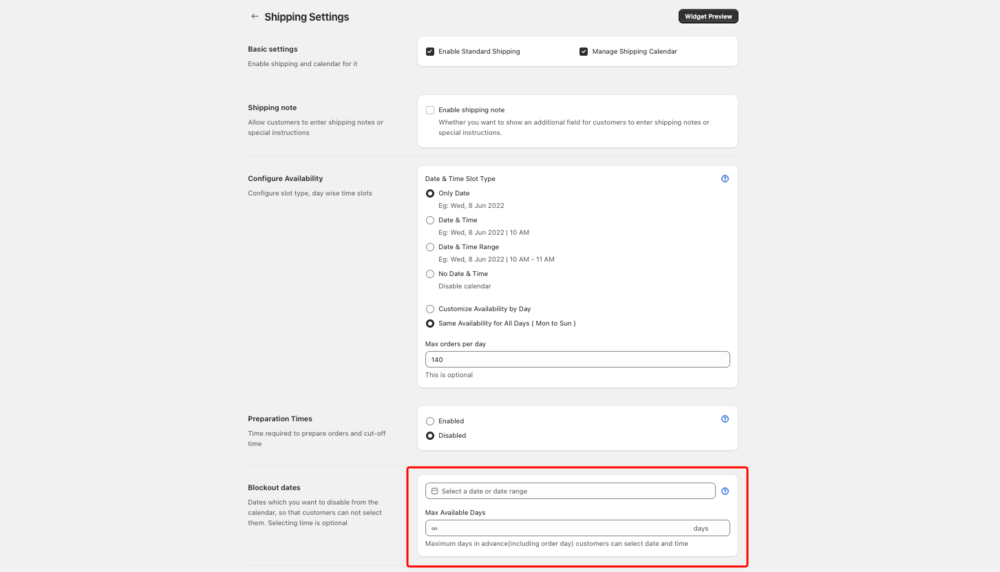
Step 2: Open the Date Picker
- Click the date input field (the field with the calendar icon that says “Select a date or date range”)
- A date picker popover will open
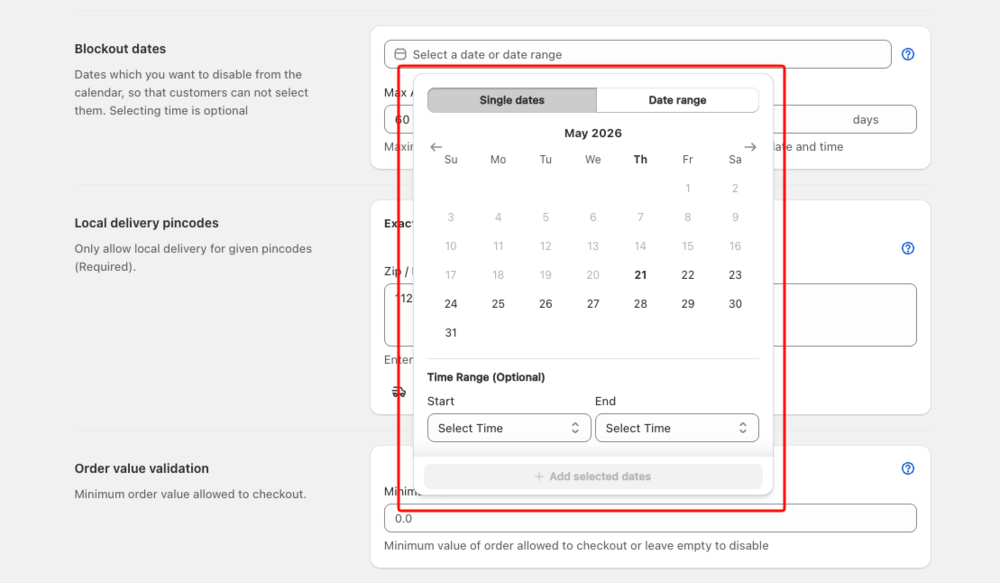
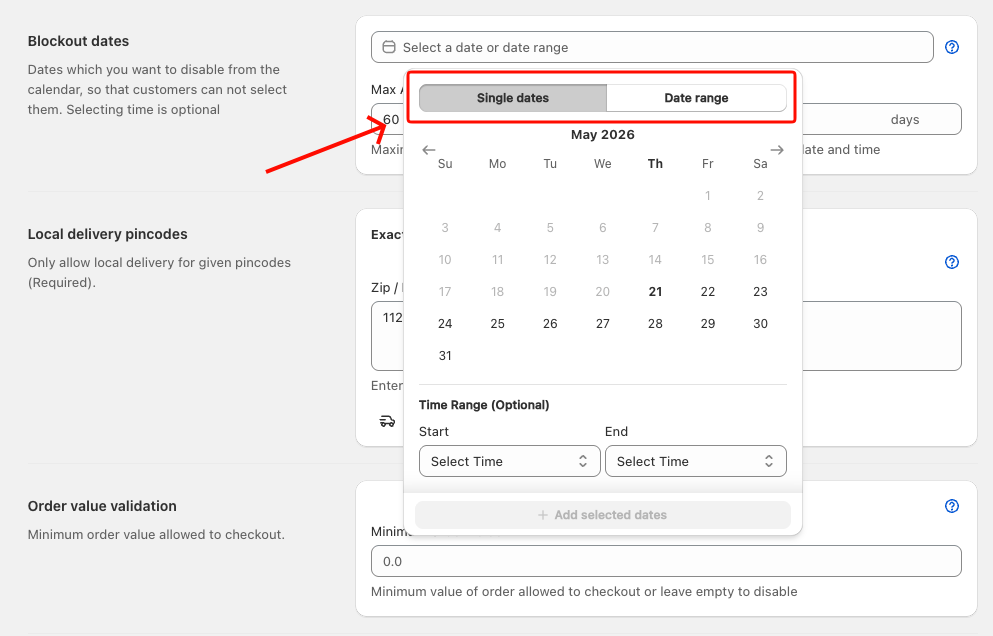
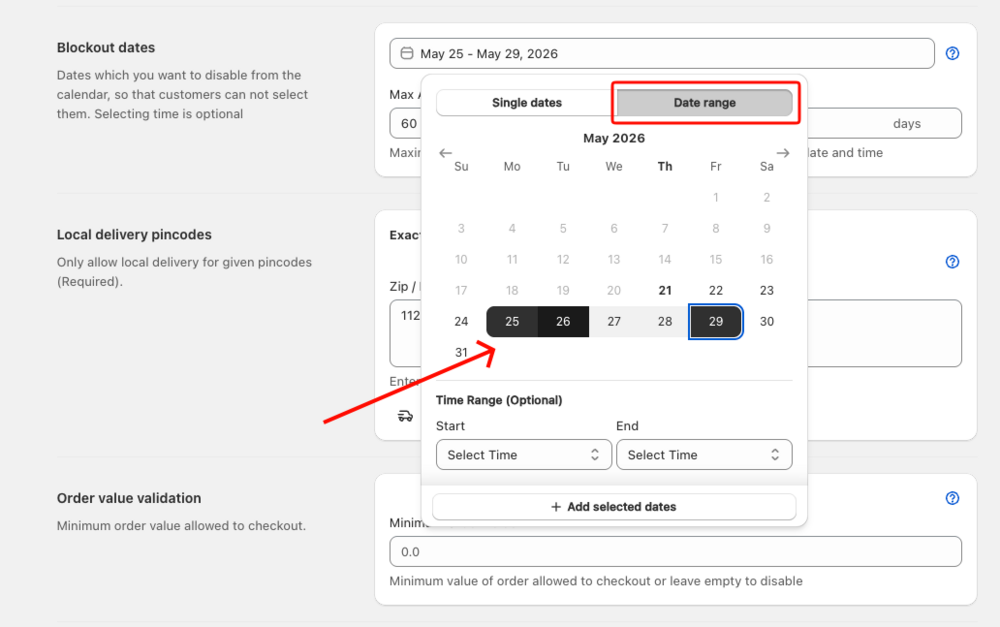
Step 3: Choose Blocking Method
Inside the date picker, select how you want to block dates using the two buttons at the top:
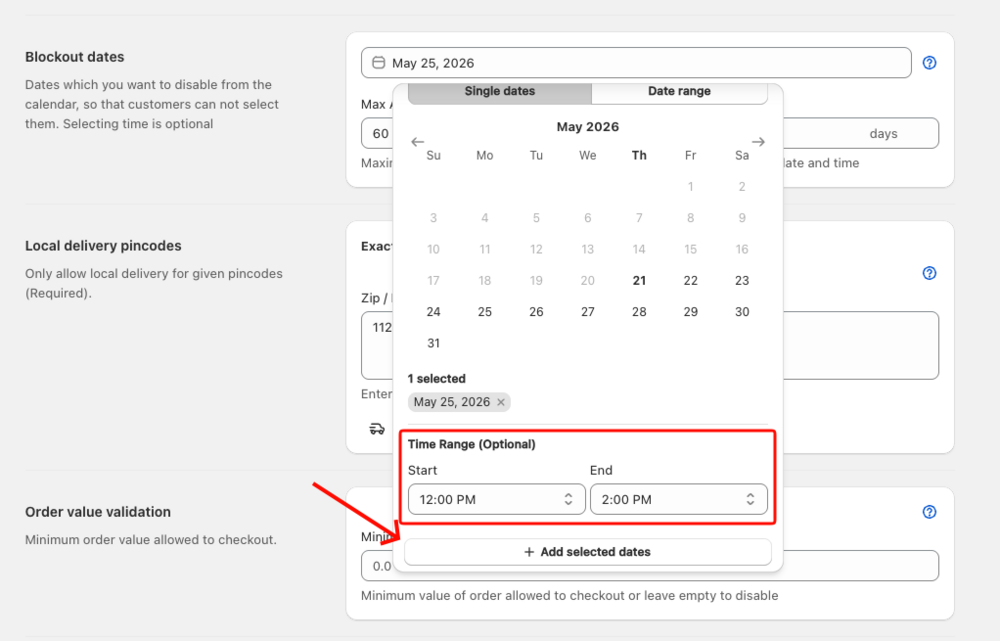
Option A: Single dates
- Click Single dates
- Use this to block one or more individual non-consecutive dates (e.g., a holiday)
- Multi-select supported — pick several dates before confirming
Option B: Date range
- Click Date range
- Use this to block a continuous span of dates (e.g., vacation closure from July 1 to July 15)
Step 4: Select Date(s)
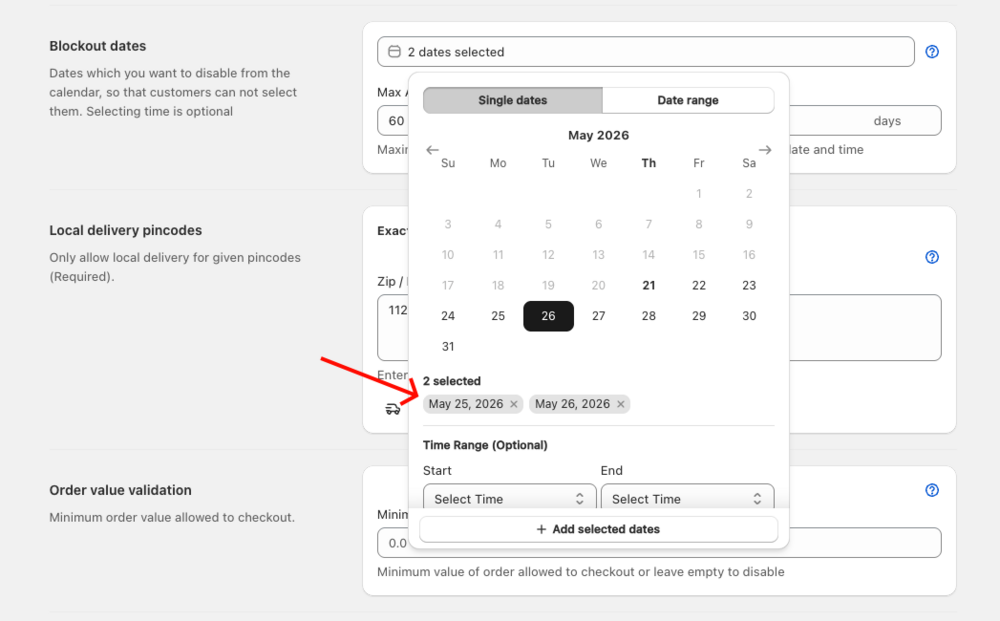
For Single dates mode:
- Click any date in the calendar to select it — it will appear as a tag below the calendar
- Click additional dates to select multiple at once
- To deselect a date, click it again in the calendar or click the × on its tag
- Use the left/right arrows to navigate between months
For Date range mode:
- Click the start date in the calendar
- Click the end date — all dates between start and end will be highlighted
- Use the left/right arrows to navigate between months
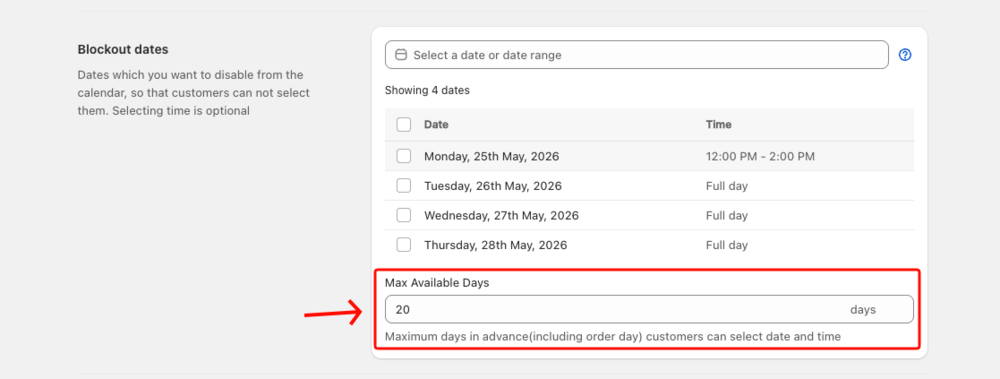
Step 5: Set Time Restrictions (Optional)
Below the calendar, you will see a Time Range (Optional) section.
Block Entire Day (default):
- Leave Start and End times empty
- The entire day will be blocked
Block a Specific Time Period:
- Set a Start time (e.g., 12:00 PM)
- Set an End time (e.g., 11:59 PM)
- Only that time window will be blocked — other time slots on that date remain available
Example: Block only afternoon hours (12:00 PM - 11:59 PM) on an early-closure day.
Step 6: Add Blocked Date(s)
- Review your selected date(s) and any time restrictions you set
- Click the Add selected dates button at the bottom of the date picker
- The popover closes and the blocked date(s) appear in the table below the date field
- Repeat from Step 2 to block additional dates
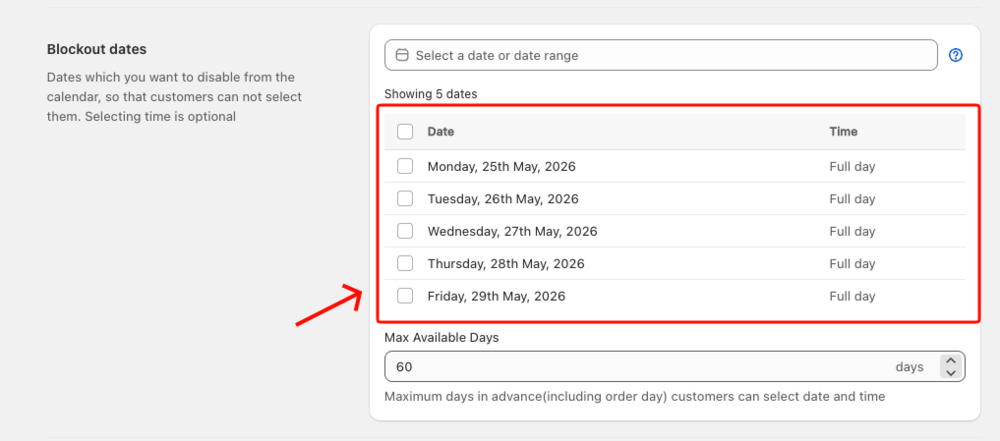
Step 7: Set Maximum Available Days
Limit how far in advance customers can book shipping orders:
- In the Blockout dates section, find Max Available Days
- Enter the number of days customers can book in advance
- Example: 30 = customers can book from the current date up to 30 days ahead (current date counts as day 1)
- Example: 14 = customers can book for the next 2 weeks
- Leave blank for unlimited (default)
- Click Save
Step 8: Save and Preview
- Review all your blocked dates in the table
- Click Save to apply changes
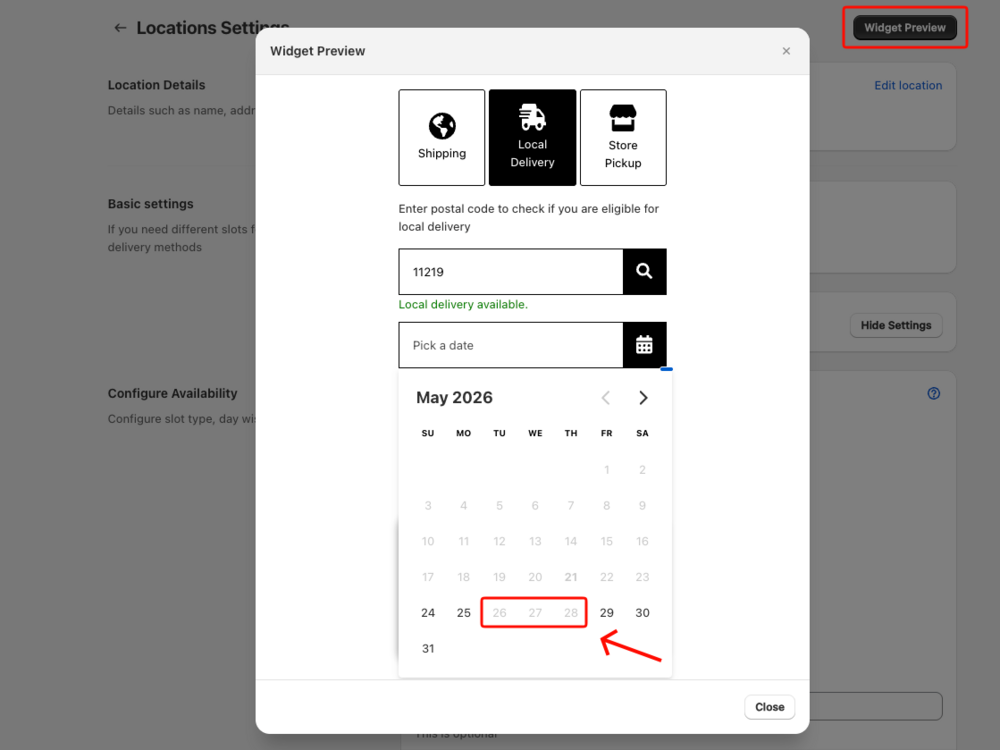
- Go to Bird Settings > Widget Design > Widget Preview to see how blocked dates appear to customers
- Test selecting dates to verify blocks work correctly
Managing Blocked Dates
Removing individual dates
- In the blocked dates table, check the box next to the date(s) you want to remove
- Click Delete selected in the bulk action bar that appears
- Click Save to apply the change
Removing multiple dates at once
- Check the boxes for all dates you want to remove, or use the header checkbox to select all visible rows
- Click Delete selected
- Click Save
Filtering the blocked dates table
When you have blockout dates across multiple months or years, filter dropdowns appear above the table:
- Use the month dropdown to show only dates from a specific month
- Use the year dropdown to show only dates from a specific year
- The table shows 10 dates per page — use the pagination arrows to navigate
Common Use Cases
Holiday Closures
Scenario: Business closed for Christmas and New Year
Configuration:
- Use Date range to block December 24-26 for Christmas
- Use Date range to block December 31 - January 1 for New Year
- Result: Customers cannot select these dates for shipping
Seasonal Breaks
Scenario: Warehouse closed for two-week summer maintenance
Configuration:
- Use Date range to block July 15 - July 29
- Result: No shipping available during maintenance period
Partial Day Closures
Scenario: Early closure on a Friday (close at noon)
Configuration:
- Use Single dates to select the specific Friday
- Set Start Time: 12:00 PM, End Time: 11:59 PM
- Result: Customers can only book Friday morning slots; afternoon is blocked
Limited Booking Window
Scenario: Only accept shipping orders up to 2 weeks in advance
Configuration:
- Set Max Available Days to 14
- Result: Customers see only the next 14 days in the calendar
Troubleshooting
Issue: Blocked dates still appear available
Problem: Blockout dates may not be saved or configured correctly.
Solution:
- Verify you clicked Add selected dates inside the date picker before the popover closed
- Check that the date appears in the blocked dates table
- Ensure you clicked Save to apply changes
- Clear browser cache and test again
Issue: Can’t select dates far in advance
Problem: Maximum Available Days may be set too low.
Solution:
- Check Max Available Days setting
- Increase the number if you want a longer booking window
- Save and test again
Quick Reference
Blocking Methods:
- Single dates: Block one or more individual dates (multi-select supported)
- Date range: Block a continuous span of dates
Time Restrictions:
- Add Start/End times to block only part of a day
- Leave blank to block the entire day
Max Available Days:
- Limits how far ahead customers can book
- Leave blank for unlimited advance booking
Navigation: Bird Settings > Shipping > Blockout dates
Related Articles
Was this article helpful?
Thanks for your feedback!