
 Store Pickup
Store Pickup: Overview
Set up store pickup locations to offer in-store pickup to your customers. This guide covers BOPIS (Buy Online Pick Up In Store), click and collect, and curbside pickup configuration. Configure availability schedules, preparation times, product restrictions, and all pickup-related features for each location.
Table of Contents
- How Pickup Location Configuration Works
- Prerequisites: Before You Begin
- Quick Start: Enable Pickup for Locations
- Pickup Configuration Options
- Testing and Verification
How Pickup Location Configuration Works
Default Mode: Configure Locations
Most users will see “Configure Locations” in Bird Settings. This is the current default and recommended approach where you:
- Configure each location individually
- Set location-specific schedules, preparation times, and blockout dates
- Customize product availability, order validation, and notifications per location
- Have maximum flexibility to adapt settings to each location’s needs
Navigation: Bird Settings > Configure Locations > [Select Location] > [Enable Store Pickup] > Edit Settings (beside “Store Pickup is Enabled” text)
Legacy Mode: Same Schedule for All Locations
If you don’t see “Configure Locations” and instead see “Pickup & Delivery” in Bird Settings, you’re using the legacy “I have same schedule for all store locations” mode. This mode:
- Applies the same schedule to all locations
- Is being sunset and is only available to grandfathered users
- We recommend switching to “I have different schedule for different store locations” to use Configure Locations

Navigation: Bird Settings > Pickup & Delivery > [Enable Store Pickup] > Edit Settings (beside “Store Pickup is Enabled” text) (legacy mode only)
Important: Once you switch from legacy mode to location-specific mode, you cannot switch back. The legacy mode is being sunset.
Prerequisites: Before You Begin
Complete these critical steps before configuring pickup locations. Missing any of these will prevent pickup from working correctly.
1. Disable Shopify’s Built-in Store Pickup
This step is for the cart-page widget. Shopify Plus stores using Bird’s checkout extension can skip it — selection happens inside checkout.
Pro Tip: When you set up Rates through the Bird App rates wizard (Bird App > Rates), Bird automatically disables Shopify’s built-in pickup for you!
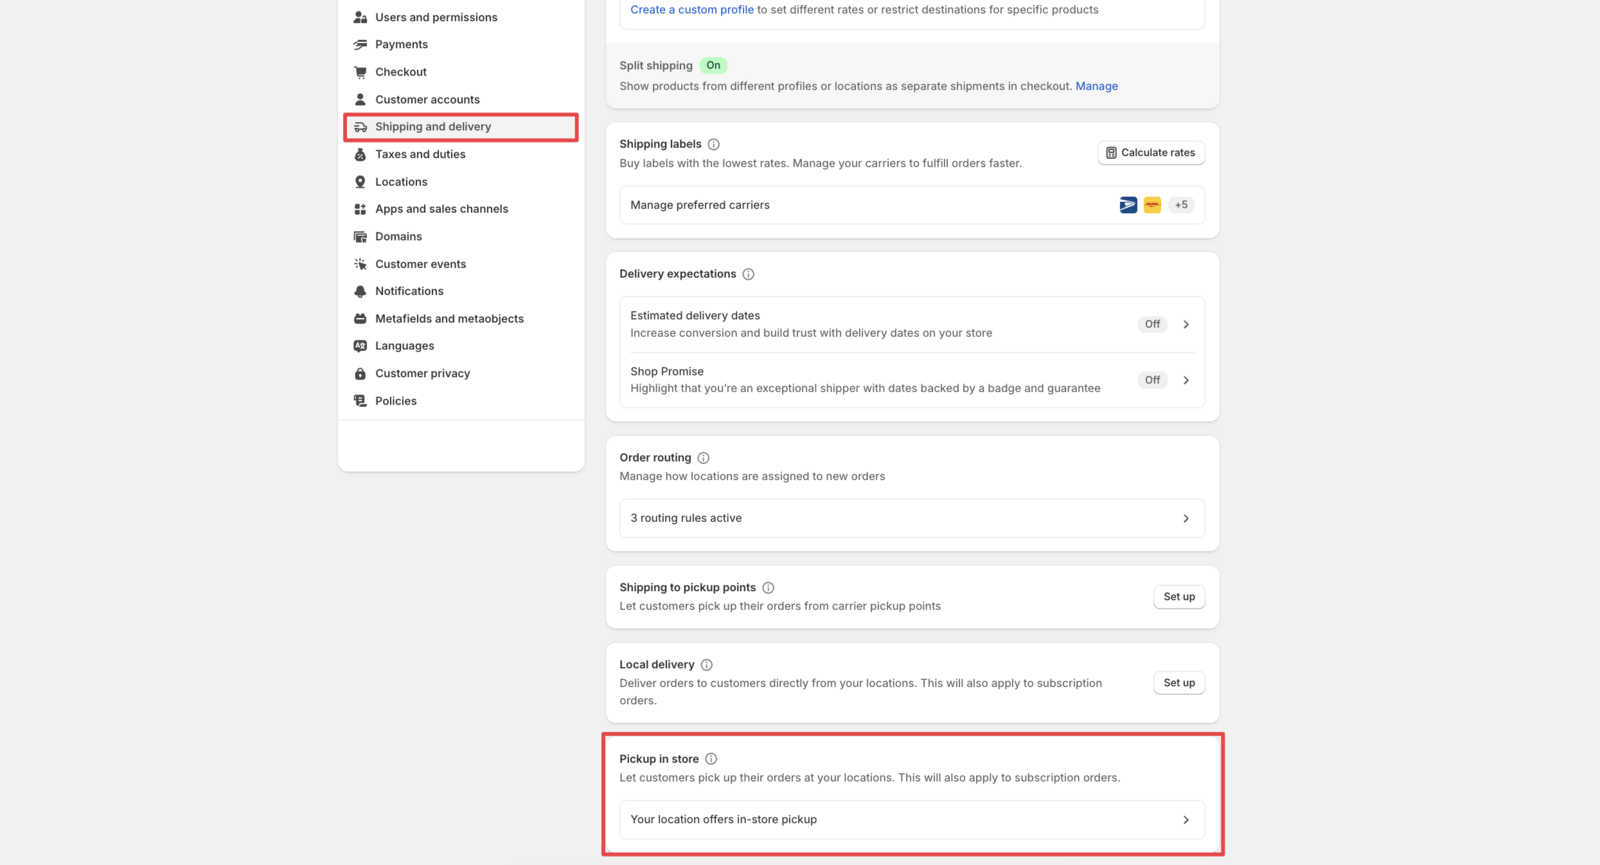
If you still see the selection for “Ship” and “Pickup” on the checkout page that means native Shopify Pickup options have not been turned off. In this case you must disable it manually:
Steps:
- Go to Shopify Admin > Settings > Shipping and delivery
- Scroll to Pickup in store section
- Click “[…] location offers in-store pickup”
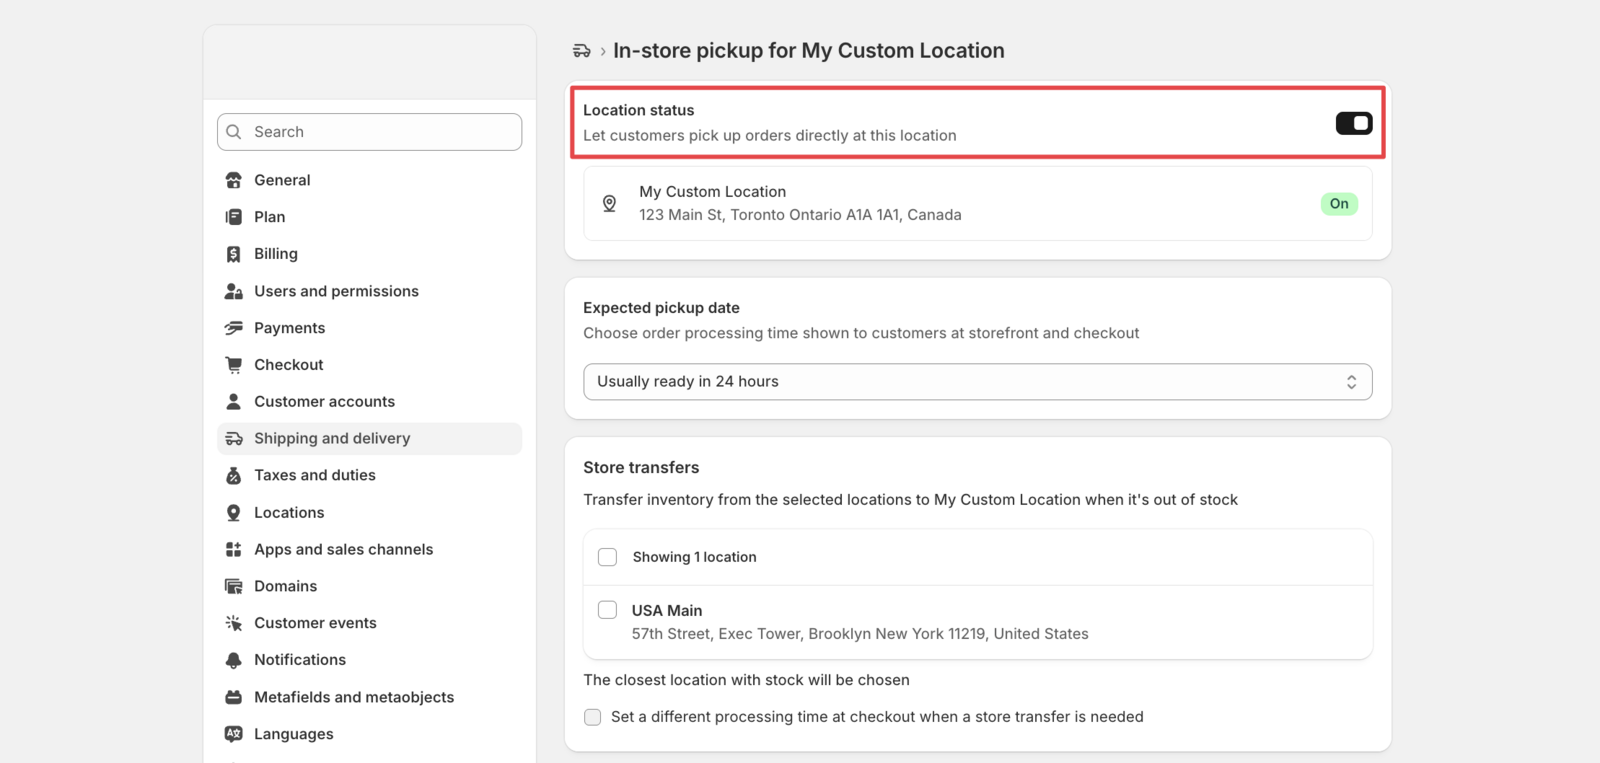
- Select each location
- Toggle Off for store pickup at each location
- Click Save
Why this is required:
- Customers who chose local delivery or shipping in the cart can switch to the free native pickup option at checkout and avoid the delivery or shipping charge
- Shopify’s native pickup step reappears at checkout, so customers choose pickup again after selecting it in the cart
- Bird can only pre-fill the pickup address and carry the cart selection through checkout when pickup runs through its own flow
- Can lead to checkout friction and abandonment
2. Enable Widget in Your Theme
The widget must be enabled for customers to see pickup options on your cart page. See How to Enable Bird Pickup and Delivery Date Widget in Your Shopify Theme for complete widget placement instructions.
3. Assign Inventory to Locations
Products must have inventory assigned to pickup locations in Shopify.
How it works:
- Bird Pickup & Delivery does not manage inventory
- All inventory is handled through Shopify’s native inventory system
- Products without inventory at a location will lead to checkout issues
Steps to assign inventory:
- Go to Shopify Admin > Products and assign inventory to the respective product
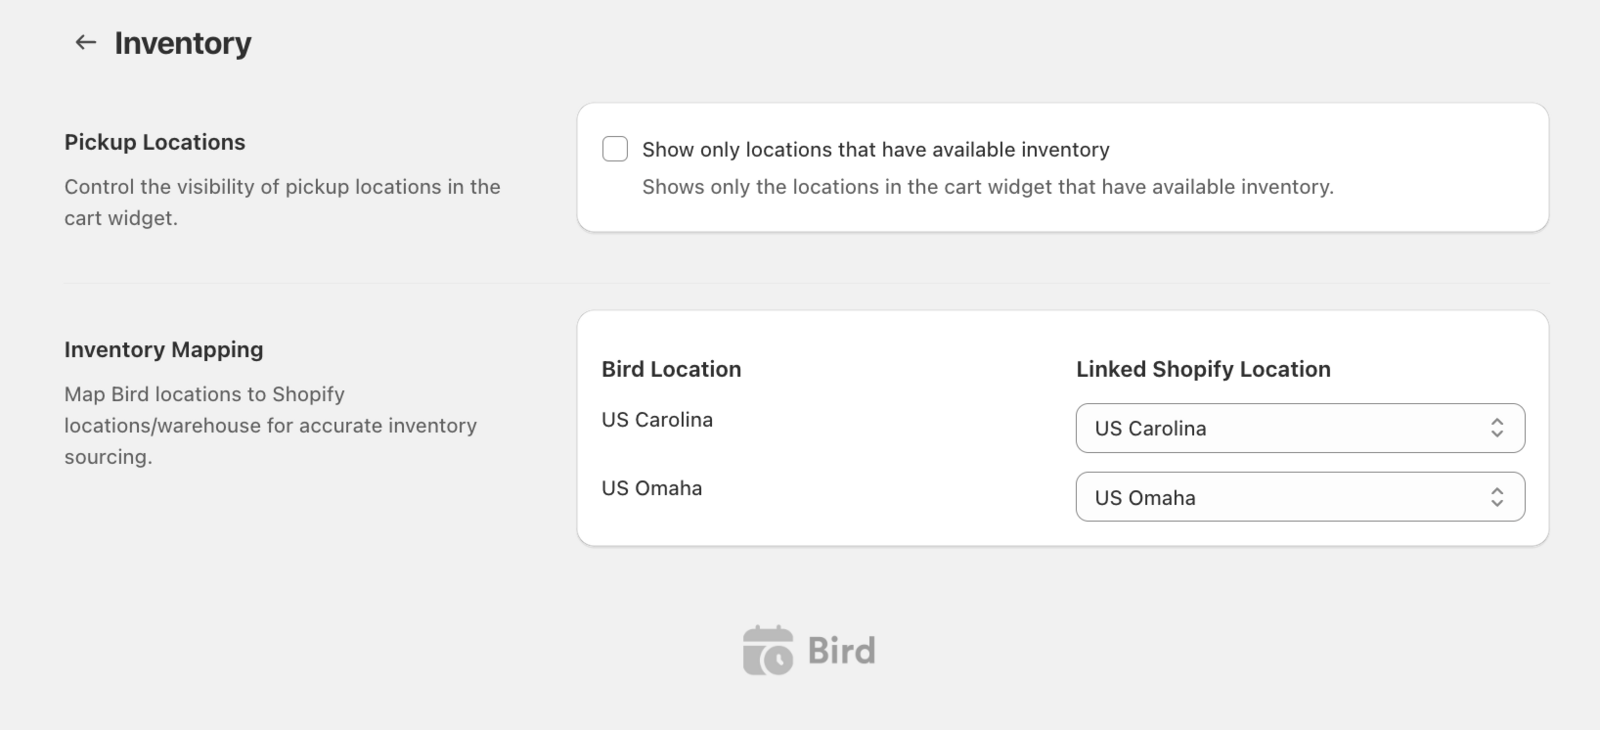
- For virtual locations or to map inventory from different warehouses, go to Bird Settings > Inventory
Optional Inventory Settings:
- Show only locations that have available inventory: Hide locations without stock in cart widget (requires Essential plan)
- Inventory Mapping: Map Bird locations to Shopify locations/warehouses for virtual locations or different inventory sources
Quick Start: Enable Pickup for Locations
Get pickup running in 3 steps using Configure Locations (default mode).
Step 1: Access Configure Locations
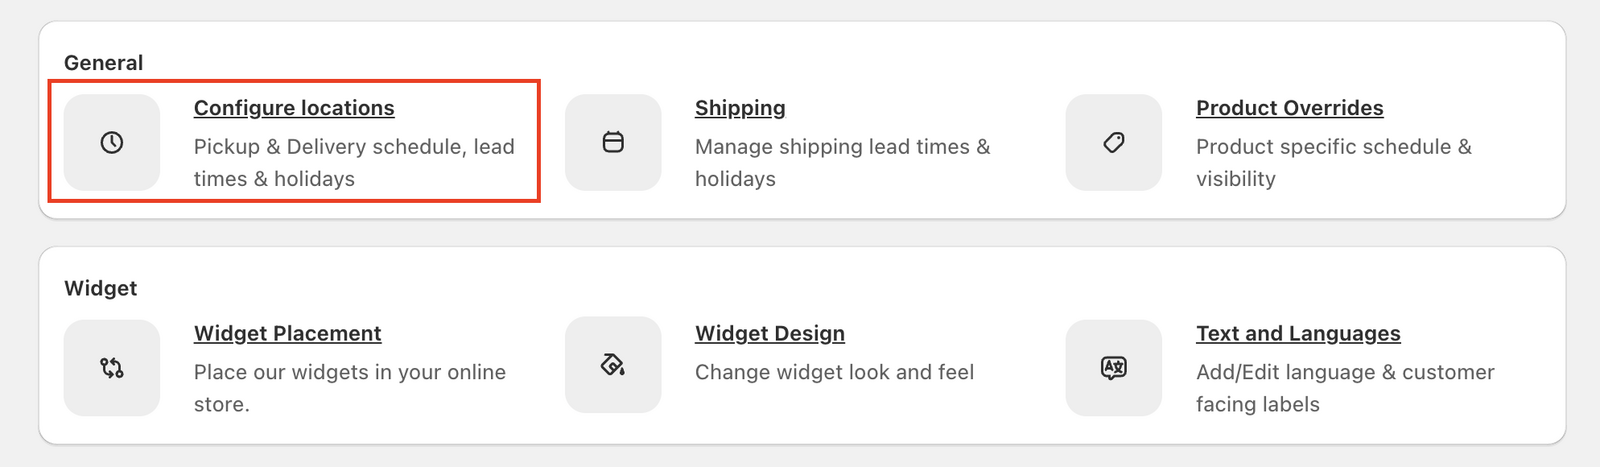
- Go to Bird Settings
- Look for Configure Locations under General
- If you see “Configure Locations”: You’re using the default location-specific mode (proceed with steps below)
- If you don’t see “Configure Locations” and see “Pickup & Delivery” instead: You’re using legacy mode. See Legacy Mode section above.
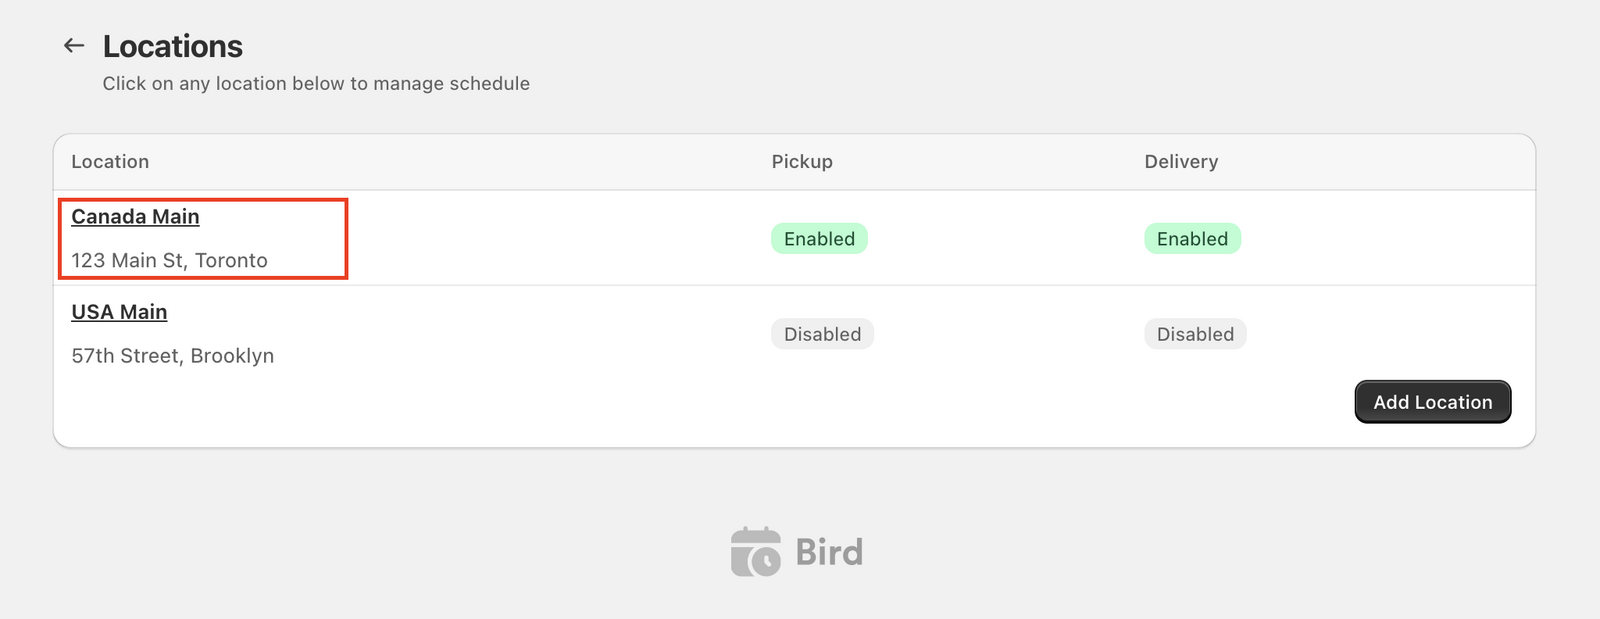
Step 2: Enable Store Pickup for a Location
- Click Configure Locations
- Review the list of all your store locations
- Click on the location where you want to enable pickup
- In the Basic Settings section, find Enable Store Pickup option
- Toggle Enable Store Pickup checkbox to turn on
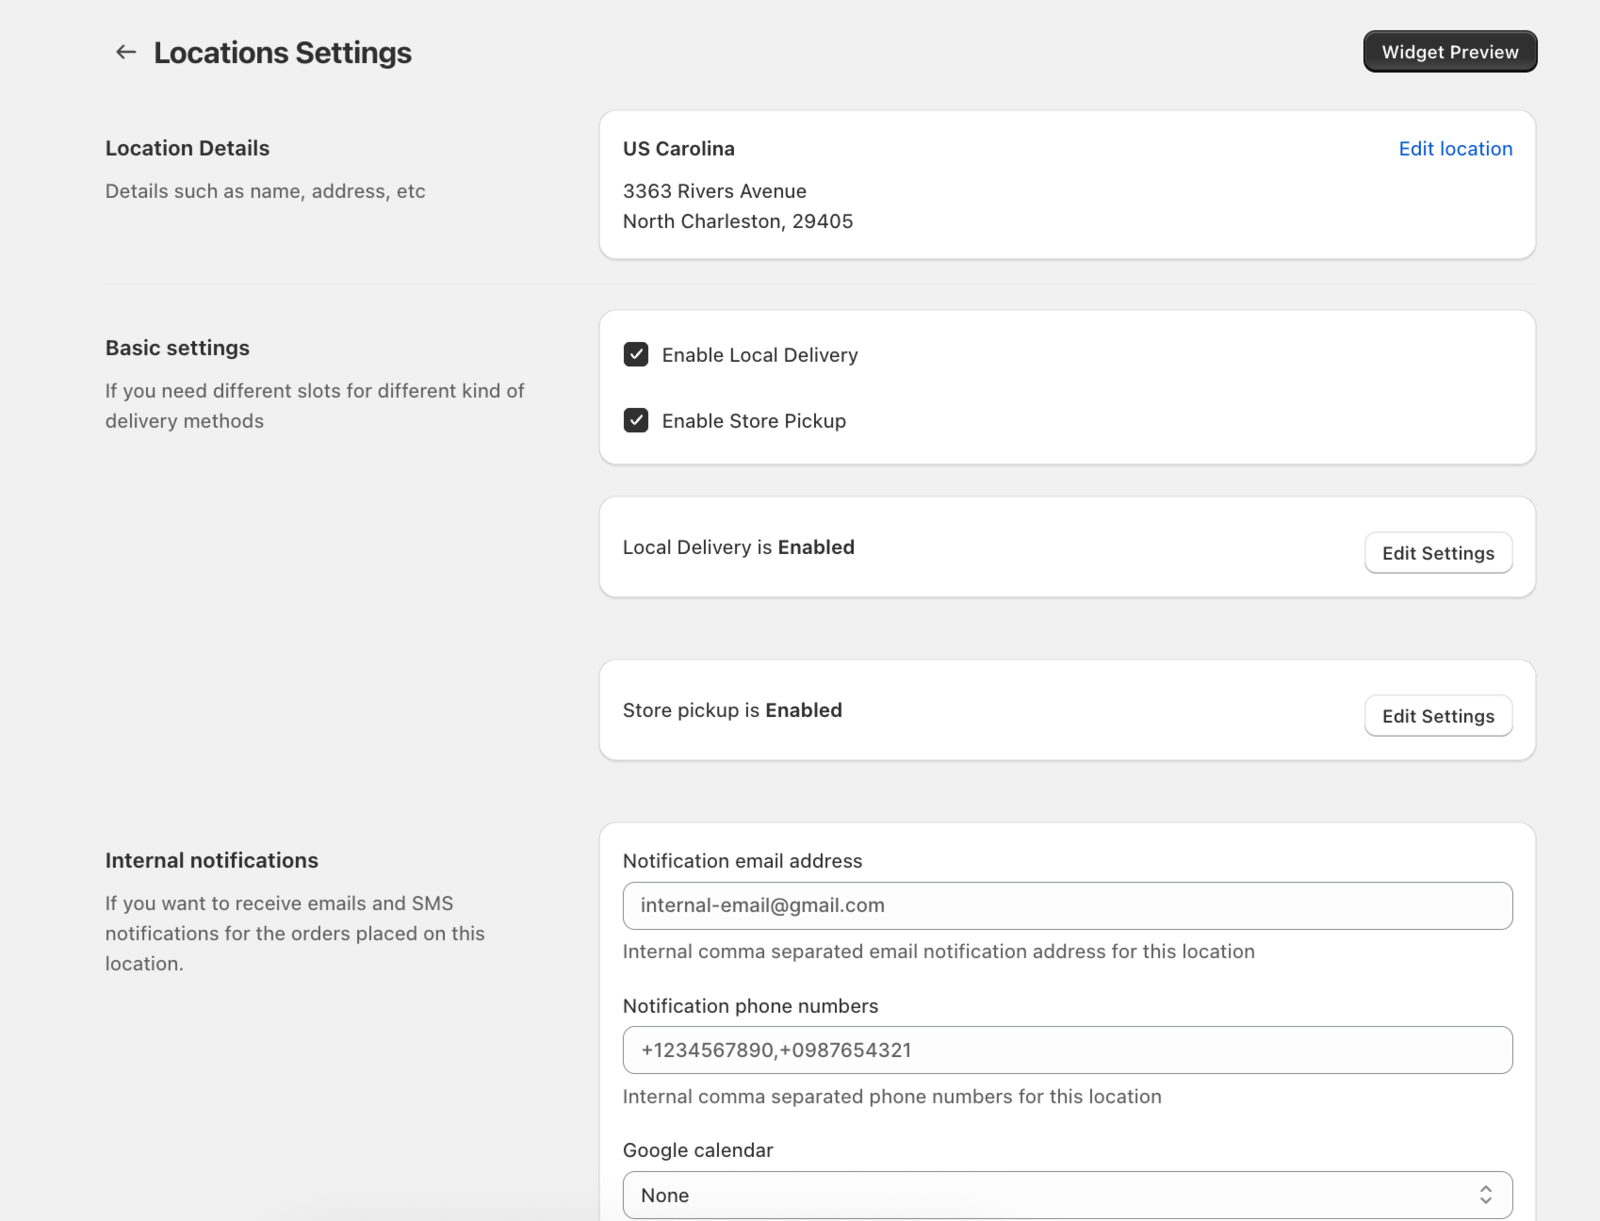
Step 3: Configure Basic Settings
- After enabling pickup for a location, scroll down on the same page
- Find the Edit Settings button for Store Pickup (its beside “Store Pickup is Enabled” text)
- Click Edit Settings
- Configure at minimum:
- Availability schedule (when customers can pick up)
- Time slot type (date only, date & time, etc.)
- Click Save
You’ve enabled pickup for this location! Repeat these steps for each location, then configure the detailed settings using the guides below.
Pickup Configuration Options
Configure all pickup features per location to match your business needs. Each feature has a detailed guide.
1. Configure Pickup Availability
Control when customers can schedule pickup orders for this location.
What it does:
- Sets operating hours and time slots for pickup at this location
- Defines how customers select dates/times (date only, specific time, time range, no date/time)
- Limits maximum orders per day or per time slot for this location
- Enables/disables specific weekdays for this location
Quick Setup:
- Go to Bird Settings > Configure Locations > [Select Location] > Edit Settings
- Scroll to Configure Pickup Availability
- Choose your schedule type and date/time options
- Add time slots if using “Date & Time” or “Date & Time Range” options
- Set order limits (optional)
- Click Save
📖 Detailed Guide: Configure Pickup Availability - Complete availability configuration tutorial
2. Pickup Preparation Time
Set minimum time required before customers can pick up orders from this location.
What it does:
- Prevents customers from selecting pickup slots too soon for this location
- Supports same-day, next-day, or custom lead times per location
- Optional cut-off time for different lead times before/after deadline
Quick Setup:
- Go to Bird Settings > Configure Locations > [Select Location] > Edit Settings
- Scroll to Preparation Time
- Toggle Enable Preparation Time to Enabled
- Choose Same for All Days or Customize by Day
- Enter lead time (e.g., 4 hours, 1 day)
- Optionally set cut-off time and separate lead times
- Click Save
📖 Detailed Guide: Pickup Preparation Time - Complete preparation time and cut-off configuration
3. Pickup Blockout Dates
Block specific dates or time periods from the pickup calendar for this location.
What it does:
- Prevents customers from selecting holidays or closed days for this location
- Blocks entire days or specific time ranges per location
- Sets maximum advance booking window for this location
Quick Setup:
- Go to Bird Settings > Configure Locations > [Select Location] > Edit Settings
- Scroll to Blockout Dates
- Choose Single Date or Date Range tab
- Select date(s) from calendar
- Optionally set start/end times for time-specific blocks
- Click Add to confirm
- Optionally Maximum Available Days (e.g., 30 days)
- Click Save
📖 Detailed Guide: Pickup Blockout Dates - Complete blockout dates tutorial
4. Order Value Validation
Set minimum order value required for pickup orders at this location.
What it does:
- Requires customers to meet a minimum cart value before checkout for this location
- Applies location-specific minimum order requirements
- Currency is inferred from Shopify’s default currency
Quick Setup:
- Go to Bird Settings > Configure Locations > [Select Location] > Edit Settings
- Scroll to Order Value Validation
- Optionally enter Minimum Order Value (e.g., 50 for $50 USD if Shopify currency is USD)
- Click Save

Note: You can set different minimum order values for different locations.
5. Product Availability for Pickup
Control which products are available for pickup at this location using product tags.
What it does:
- Controls whether settings apply to all products or specific products for this location
- Restricts pickup to specific products using Shopify product tags
- Includes only tagged products OR excludes tagged products for this location
- Works alongside Shopify inventory management
Quick Setup:
- Go to Bird Settings > Configure Locations > [Select Location] > Edit Settings
- Scroll to Product Availability
- Choose All Products, Include Products Tagged With, or Exclude Products Tagged With
- If using tags, enter product tags in the search/select field
- Click Save
📖 Detailed Guide: Store Pickup Availability - Product Availability - Product tag configuration for pickup
6. Configure Pickup Rates
Set up pricing for pickup orders at this location.
What it does:
- Links to pickup rate configuration for this location
- Allows you to set free or paid pickup rates per location
- Can configure rates based on conditions (price, day, weight, etc.)
Quick Setup:
- Go to Bird Settings > Configure Locations > [Select Location] > Edit Settings
- Scroll to Configure Rates section
- Click the hyperlink to access rate settings for this location
- Configure your pickup rates
- Save rate configuration
📖 Detailed Guide: How to Configure Pickup Rates - Complete pickup rate setup
7. Pickup Security Code
Add security verification for in-store pickup orders (applies to all locations).
What it does:
- Generates unique 8-character code for each pickup order
- Provides QR code for easy verification
- Sends code to customers in “Ready for Pickup” email
- Allows staff to verify codes at pickup
Quick Setup:
- Go to Bird Settings > (Advance) > Pickup
- Toggle Enable Pickup Security Code checkmark to turn on
- Click Save
📖 Detailed Guide: Pickup Security Code - Security code setup and verification process
8. Collection Additional Pickup Information from Customer
Collect additional information from customers during pickup checkout, such as pickup notes, collector name, and collector email (applies to all locations).
What it does:
- Customer Pickup Note: Adds a text field where customers can enter special instructions for their pickup orders (can be made required)
- Collector Name: Adds a field for customers to enter the name of the person picking up the order (if different from customer)
- Collector Email: Adds a field for the collector’s email address (with email or text field type option)
Quick Setup:
- Go to Bird Settings > (Advance) > Pickup
- Enable desired options:
- Toggle Enable pickup note to collect customer instructions
- Optionally toggle Make pickup note required to force entry
- Toggle Enable pickup collector name to collect pickup person’s name
- Toggle Enable pickup collector email to collect collector’s email
- Click Save
📖 Detailed Guide: Store Pickup: Collecting Additional Information from Customers - Complete guide for pickup notes, collector name, and collector email
9. Advanced Pickup Settings (Global)
Configure advanced pickup settings to enhance the customer experience and streamline order processing (applies to all locations).
Available Settings:
- Prepopulate pickup location address in checkout: Automatically fills checkout address field with selected pickup location
- Fix pickup address after order placed: Automatically restores pickup address if changed during checkout
- Enable location search for pickup: Adds search box to location dropdown when you have 3+ locations
Quick Setup:
- Go to Bird Settings > (Advance) > Pickup
- Enable desired settings:
- Toggle Prepopulate pickup location address in checkout to auto-fill address
- Toggle Fix pickup address after order placed to restore address if changed
- Toggle Enable location search for pickup to add search functionality
- Click Save
📖 Detailed Guide: Store Pickup: Advanced Settings - Complete advanced settings configuration for address management and location selection
10. Pickup Validation Settings
Configure validation rules for pickup orders.
Available Settings:
- Revalidate pickup location postal code in checkout: Validates postal code matches between cart and checkout (pickup-specific)
- Validate Selections: Makes date/time selection mandatory before checkout (applies to all fulfillment methods)
- Enable selections expiry: Invalidates selections after specified time (1-24 hours, applies to all fulfillment methods)
Quick Setup:
- Go to Bird Settings > Validations
- Configure validation settings
- Click Save
Note: “Validate Selections” and “Enable selections expiry” apply to all fulfillment methods (pickup, delivery, shipping). “Revalidate pickup location postal code” is pickup-specific.
📖 Detailed Guides:
- Validate and Expire Stale Delivery/Pickup Time Selections - Selections expiry configuration
- How to Make Date and Time Selection Mandatory - Validate selections setup
Testing and Verification
Verify your pickup configuration is working correctly before going live.
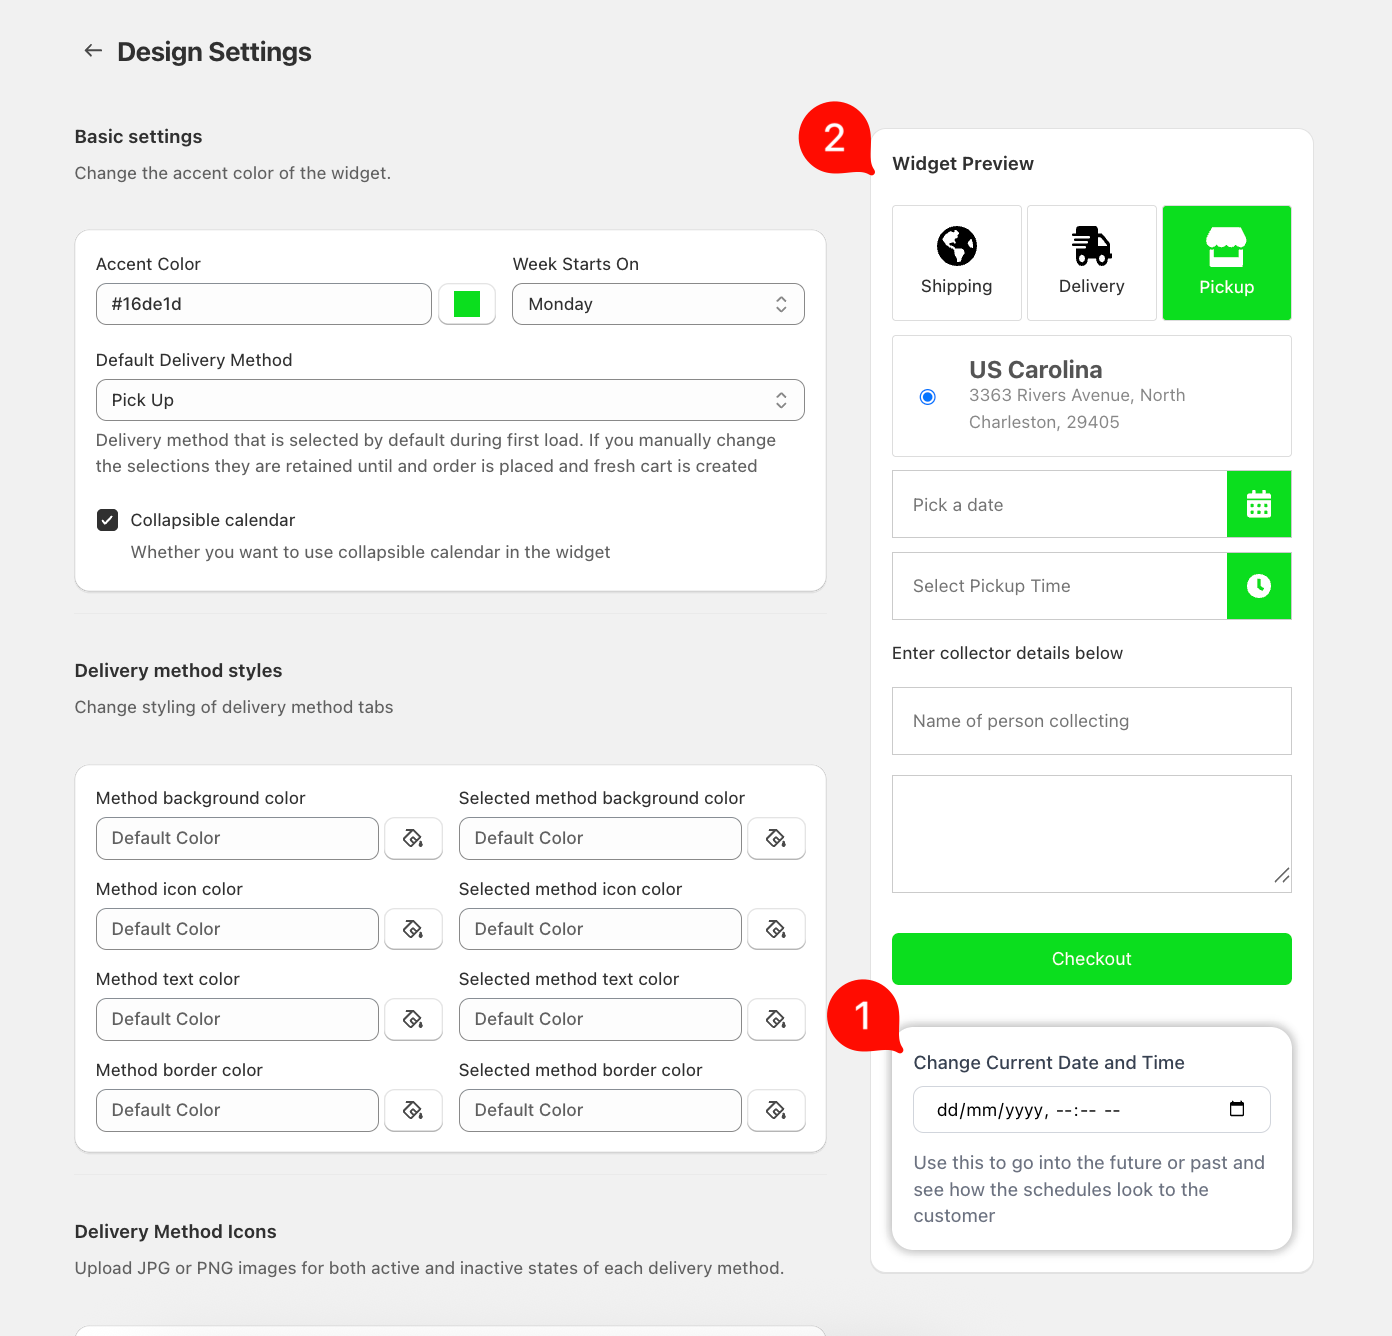
Use Widget Preview
Widget Preview allows you to test your configuration without placing actual orders.
Steps:
- In Bird Settings > Widget Design
- See Widget Preview on the right
- Select Pickup method in the preview
- Simulate any date and time via Change Current Date and Time option
- Verify:
- Location appears in widget dropdown
- Time slots show correctly (if configured)
- Blocked dates are grayed out
- Preparation time is respected (earliest available date/time)
Note: Widget Preview simulates the customer experience. Use it to verify your settings before customers place orders.
Place a Test Order
Complete end-to-end verification by placing a test order.
Steps:
- Go to your store’s cart page
- Add products that have inventory at your pickup location
- Select Pickup method in the Bird widget
- Choose a location (if multiple locations)
- Select date and time (if configured)
- Complete checkout
- Verify order appears in Shopify Admin > Orders with correct pickup details
📖 Detailed Guide: Verify Your Widget Setup: Place a Test Order - Complete test order verification steps
Related Articles
Was this article helpful?
Thanks for your feedback!