
 Local Delivery
Local Delivery: Overview
Set up local delivery to offer scheduling for deliveries directly to your customers. Configure delivery zones by postal code (ZIP code) or radius, availability schedules, preparation times, product restrictions, and all delivery-related features for each location to maximize flexibility.
Table of Contents
- How Delivery Location Configuration Works
- Prerequisites: Before You Begin
- Quick Start: Enable Delivery for Locations
- Delivery Configuration Options
- Testing and Verification
How Delivery Location Configuration Works
Configure Locations (Default)
Most users will see “Configure Locations” in Bird Settings. This is the current default and recommended approach where you:
- Configure each location individually
- Set location-specific schedules, preparation times, and blockout dates
- Customize product availability, order validation, and notifications per location
- Have maximum flexibility to adapt settings to each location’s needs
Navigation: Bird Settings > Configure locations > [Select Location] > [Enable local delivery] > Edit settings (beside “Local delivery is Enabled” text)
Same Schedule for All Locations (Legacy Mode)
If you don’t see “Configure Locations” and instead see “Pickup & Delivery” in Bird Settings, you’re using the legacy “I have same schedule for all store locations” mode. This mode:
- Applies the same schedule to all locations
- Is being sunset and is only available to grandfathered users
- We recommend switching to “I have different schedule for different store locations” to use Configure Locations

Navigation: Bird Settings > Pickup & delivery > [Enable local delivery] > Edit settings (beside “Local delivery is Enabled” text) (legacy mode only)
Important: Once you switch from legacy mode to location-specific mode, you cannot switch back. The legacy mode is being sunset.
Prerequisites: Before You Begin
Complete these critical steps before configuring delivery locations. Missing any of these will prevent delivery from working correctly.
1. Enable Widget in Your Theme
The widget must be enabled for customers to see delivery options on your cart page. See this article for complete widget placement instructions.
2. Assign Inventory to Locations
Products must have inventory assigned to delivery locations in Shopify.
How it works:
- Bird Pickup & Delivery does not manage inventory
- All inventory is handled through Shopify’s native inventory system
- Products without inventory at a location will lead to checkout issues
Steps to assign inventory:
- Go to Shopify Admin > Products and assign inventory to the respective product
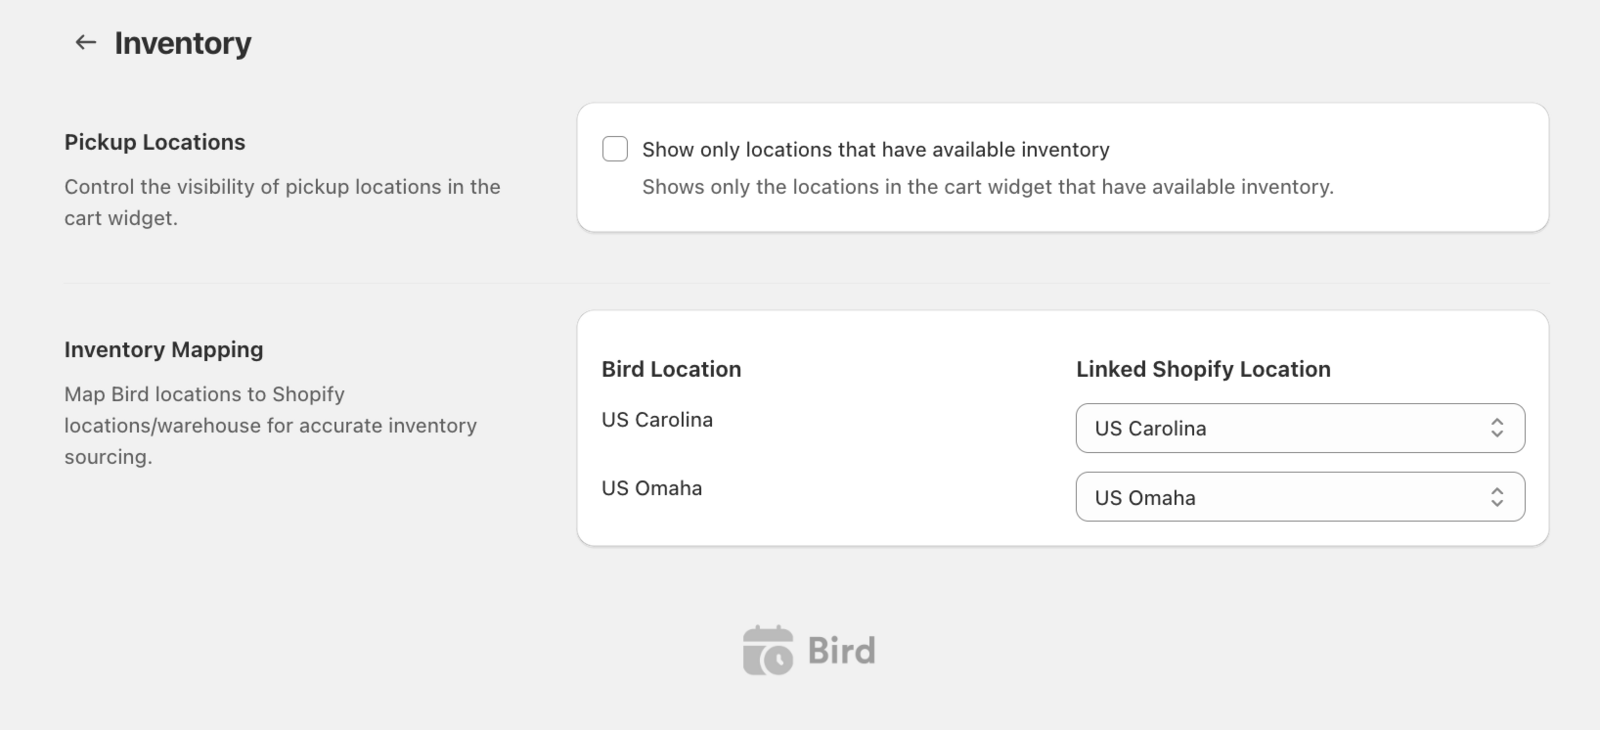
- For virtual locations or to map inventory from different warehouses, go to Bird Settings > Inventory
Optional Inventory Settings in Bird Settings > Inventory:
- Enable realtime inventory (Widget V2; shown as Show only locations that have available inventory on the legacy widget): Pickup and delivery options without inventory show an unavailable message
- Inventory Mapping: Map Bird locations to Shopify locations/warehouses for virtual locations or different inventory sources.
3. Mark Products as Physical
Products must be marked as physical in Shopify for the delivery address form to appear.
Why this is required:
- Virtual/digital products don’t require delivery address
- Customers won’t see delivery address field if products are marked as digital
- Delivery options will not appear for non-physical products
Steps to mark products as physical:
- Go to Shopify Admin > Products
- Select each product
- Under Inventory section, ensure “This is a physical product” is checked
- Click Save
📖 Detailed Guide: How to Mark Products as Physical Products in Shopify
Quick Start: Enable Delivery for Locations
Get delivery running in 3 steps using Configure Locations (default mode).
Step 1: Access Configure Locations
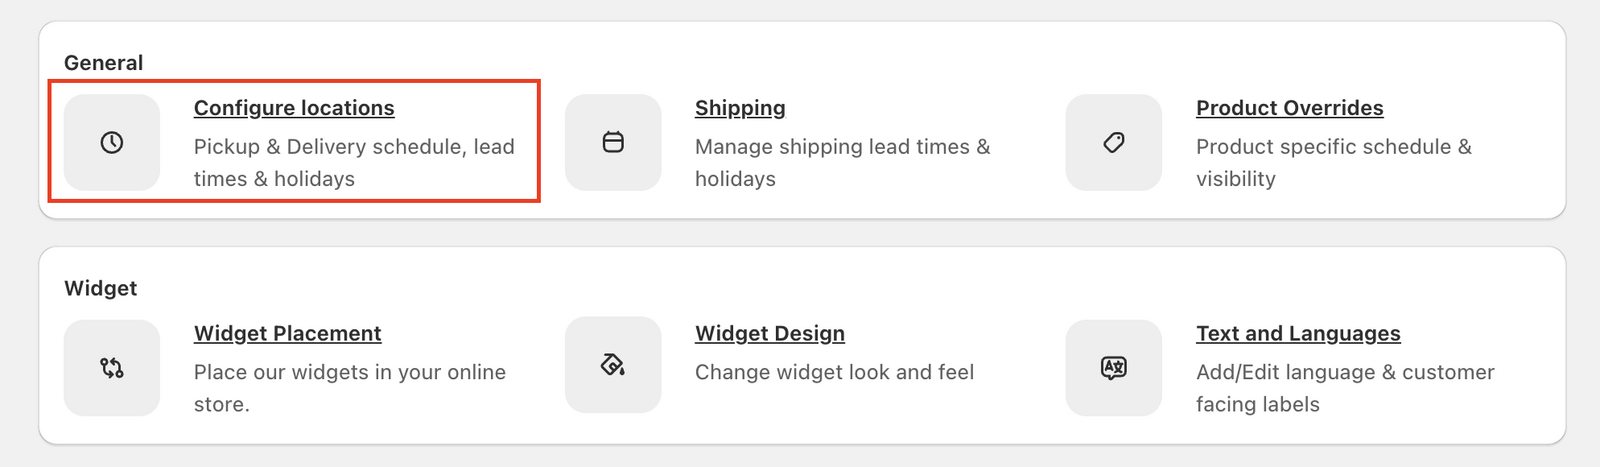
- Go to Bird Settings
- Look for Configure Locations under General
- If you see “Configure Locations”: You’re using the default location-specific mode (proceed with steps below)
- If you don’t see “Configure Locations” and see “Pickup & Delivery” instead: You’re using legacy mode. See Legacy Mode section above.
Step 2: Enable Local Delivery for a Location
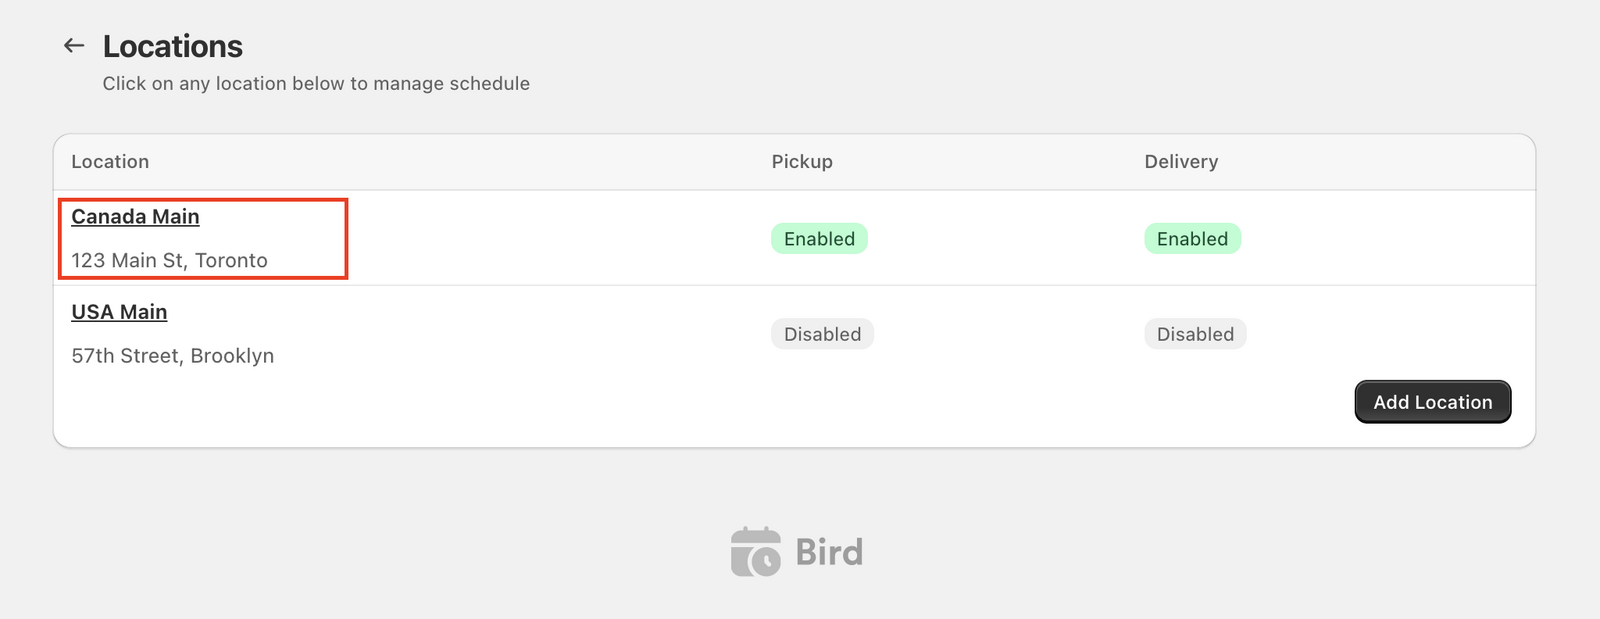
- Click Configure Locations
- Review the list of all your store locations
- Click on the location where you want to enable delivery
- In the Basic settings section, find the Enable local delivery option
- Check the Enable local delivery checkbox
Step 3: Configure Basic Settings
- After enabling delivery for a location, scroll down on the same page
- Find the Edit settings button for local delivery (beside the “Local delivery is Enabled” text)
- Click Edit settings
- Configure at minimum:
- Availability schedule (when customers can receive deliveries)
- Time slot type (date only, date & time, etc.)
- Local delivery zip/postal codes (required - enter postal codes eligible for delivery) OR Local delivery radius / Driving distance (if using radius or driving-distance validation)
- Click Save
Note: The Local delivery zip/postal codes section sits below Date specific order limits. You’ll see the matching type (e.g., “Partial postal code match”) which is configured in Bird Settings > Delivery > Distance validation mode.
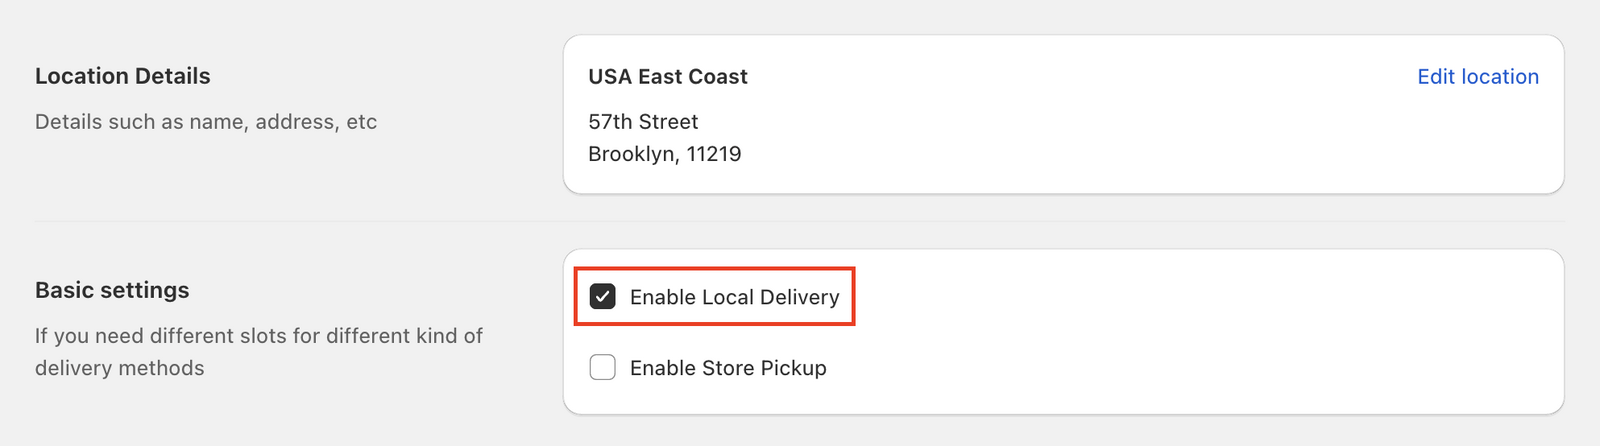
You’ve enabled delivery for this location! Repeat these steps for each location, then configure the detailed settings using the guides below.
Delivery Configuration Options
Configure all delivery features per location to match your business needs. Each feature has a detailed guide.
1. Configure Delivery Availability
Control when customers can schedule delivery orders for this location.
What it does:
- Sets operating hours and time slots for delivery at this location
- Defines how customers select dates/times (date only, specific time, time range, no date/time)
- Limits maximum orders per day or per time slot for this location
- Enables/disables specific weekdays for this location
Quick Setup:
- Go to Bird Settings > Configure locations > [Select Location] > Edit settings
- Scroll to Configure availability
- Choose your schedule type and date/time options
- Add time slots if using “Date & Time” or “Date & Time Range” options
- Set order limits (optional)
- Click Save
📖 Detailed Guide: Local Delivery: Configure Availability - Complete availability configuration tutorial
2. Delivery Preparation Time
Set minimum time required before customers can receive delivery orders from this location.
What it does:
- Prevents customers from selecting delivery slots too soon for this location
- Supports same-day, next-day, or custom lead times per location
- Optional cut-off time for different lead times before/after deadline
Quick Setup:
- Go to Bird Settings > Configure locations > [Select Location] > Edit settings
- Scroll to Preparation times
- Select Enabled
- Choose Same preparation time for all days (Mon to Sun) or Customize preparation time by day
- Enter lead time (e.g., 4 hours, 1 day)
- Optionally set cut-off time and separate lead times
- Click Save
📖 Detailed Guide: Local Delivery: Preparation Time - Complete preparation time and cut-off configuration
3. Delivery Blockout Dates
Block specific dates or time periods from the delivery calendar for this location.
What it does:
- Prevents customers from selecting holidays or closed days for this location
- Blocks entire days or specific time ranges per location
- Sets maximum advance booking window for this location
Quick Setup:
- Go to Bird Settings > Configure locations > [Select Location] > Edit settings
- Scroll to Blockout Dates
- Open the date picker and choose Single dates or Date range
- Select date(s) from calendar
- Optionally set start/end times for time-specific blocks
- Click Add selected dates to confirm
- Optionally set Max available days (e.g., 30 days)
- Click Save
📖 Detailed Guide: Local Delivery: Blockout Dates - Complete blockout dates tutorial
4. Local Delivery Postal Codes
Restrict delivery to specific postal codes for this location. The section is called Local delivery zip/postal codes and sits below Date specific order limits.
What it does:
- Restricts delivery to only the postal codes you specify for this location
- Uses the matching type configured in Bird Settings > Delivery (exact match, partial match, or advanced match)
- Required: You must enter at least one postal code to enable delivery for this location
- Links to configured delivery rates for the entered postal codes
How it works:
- The matching type (e.g., “Partial postal code match”) is configured in Bird Settings > Delivery > Distance validation mode
- You enter the actual postal codes in this location’s settings
- The system validates customer postal codes against your list using the matching type you selected
Quick Setup:
- Go to Bird Settings > Configure locations > [Select Location] > Edit settings
- Scroll to Local delivery zip/postal codes (below Date specific order limits)
- Review the matching type shown (e.g., “Partial postal code match”) - this reflects your Distance validation mode setting
- In the ZIP / postal codes field, enter comma-separated postal codes
- Example:
11001,11002,11003,11004 - You can use wildcards if your validation mode supports it (e.g.,
11*matches all codes starting with 11)
- Example:
- Click Save
Important Notes:
- This field is required - you must enter at least one postal code to enable delivery
- The matching type can be changed in Bird Settings > Delivery > Distance validation mode
- If you see “X rates configured for above postal codes” link, click it to view or edit delivery rates for these postal codes
- For radius-based validation (UAE, Qatar, Hong Kong), use the Local delivery radius field instead of postal codes
📖 Detailed Guides:
- No Validation (Disable All)
- Postal Code Validation (Exact, Partial, Advanced)
- Radius Based Validation
5. Order Value Validation
Set minimum order value required for delivery orders at this location.
What it does:
- Requires customers to meet a minimum cart value before checkout for this location
- Applies location-specific minimum order requirements
- Currency is inferred from Shopify’s default currency
Quick Setup:
- Go to Bird Settings > Configure locations > [Select Location] > Edit settings
- Scroll to Order Value Validation
- Optionally enter Minimum Order Value (e.g., 50 for $50 USD if Shopify currency is USD)
- Click Save

Note: You can set different minimum order values for different locations.
6. Product Availability for Delivery
Control which products are available for delivery at this location using product tags.
What it does:
- Controls whether settings apply to all products or specific products for this location
- Restricts delivery to specific products using Shopify product tags
- Includes only tagged products OR excludes tagged products for this location
- Works alongside Shopify inventory management
Quick Setup:
- Go to Bird Settings > Configure locations > [Select Location] > Edit settings
- Scroll to Product Availability
- Choose All Products, Include Products Tagged With, or Exclude Products Tagged With
- If using tags, enter product tags in the search/select field
- Click Save
📖 Detailed Guide: Local Delivery: Product Availability - Product tag configuration for delivery
7. Configure Delivery Rates
Set up pricing for delivery orders at this location.
What it does:
- Allows you to set free or paid delivery rates per location
- Can configure rates based on conditions (price, day, weight, SKU, rush delivery, time, date)
- Supports postal code-based zones with different rates per zone
- Supports radius-based delivery zones with distance-based pricing
Quick Setup:
- Go to Bird App > Rates
- Find the Delivery section
- Choose I have same rates for all my store locations or delivery zones or I have different rates for different store locations or delivery zones
- Configure your delivery rates with conditions
- Save rate configuration
📖 Detailed Guides:
- Delivery Rates - Complete delivery rate setup with flexible pricing conditions
- Set Up Postal Code-Based Local Delivery Rates - Create multiple delivery zones with different rates
- Configure Local Delivery Rates based on Radius - Address-based delivery zones with Google Maps
Note: After configuring postal codes in the Local delivery zip/postal codes section, you can click the “X rates configured for above postal codes” link to view or configure delivery rates for those postal codes.
8. Validation Settings
Configure how postal codes are matched and how selections are validated for delivery orders.
Available Settings:
- Distance validation mode (Bird Settings > Delivery): Choose how postal codes are matched (Exact, Partial, or Advanced) - this determines the matching type shown in Local Delivery Postal Codes section
- Revalidate delivery location postal code in checkout (Bird Settings > Validations > Postal code validation settings): Validates postal code matches between cart and checkout (delivery-specific)
- Validate selections (Bird Settings > Validations > Basic validation settings): Makes date/time selection mandatory before checkout (applies to all fulfillment methods)
- Enable selections expiry (Bird Settings > Validations > Basic validation settings): Invalidates selections after specified time (1-24 hours, applies to all fulfillment methods)
Quick Setup:
- Go to Bird Settings > Delivery
- Under Distance validation mode, choose:
- Exact postal code match: Postal codes must match exactly
-
Partial postal code match: Supports wildcards (e.g.,
11*matches all codes starting with 11) - Advanced postal code match: More flexible matching patterns
- Click Save
- Go to Bird Settings > Validations to configure the other validation settings as needed
Important: The Distance validation mode you select here determines the matching type displayed in the Local Delivery Postal Codes section for each location. For example, if you select “Partial” here, locations will show “Partial postal code match” in their postal code configuration section.
Note: “Validate selections” and “Enable selections expiry” apply to all fulfillment methods (pickup, delivery, shipping). “Revalidate delivery location postal code” and “Distance validation mode” are delivery-specific.
📖 Detailed Guides:
- Validate and Expire Stale Delivery/Pickup Time Selections - Selections expiry configuration
- How to Make Date and Time Selection Mandatory - Validate selections setup
Testing and Verification
Verify your delivery configuration is working correctly before going live.
Use Widget Preview
Widget Preview allows you to test your configuration without placing actual orders.
Steps:
- In Bird Settings > Widget Design
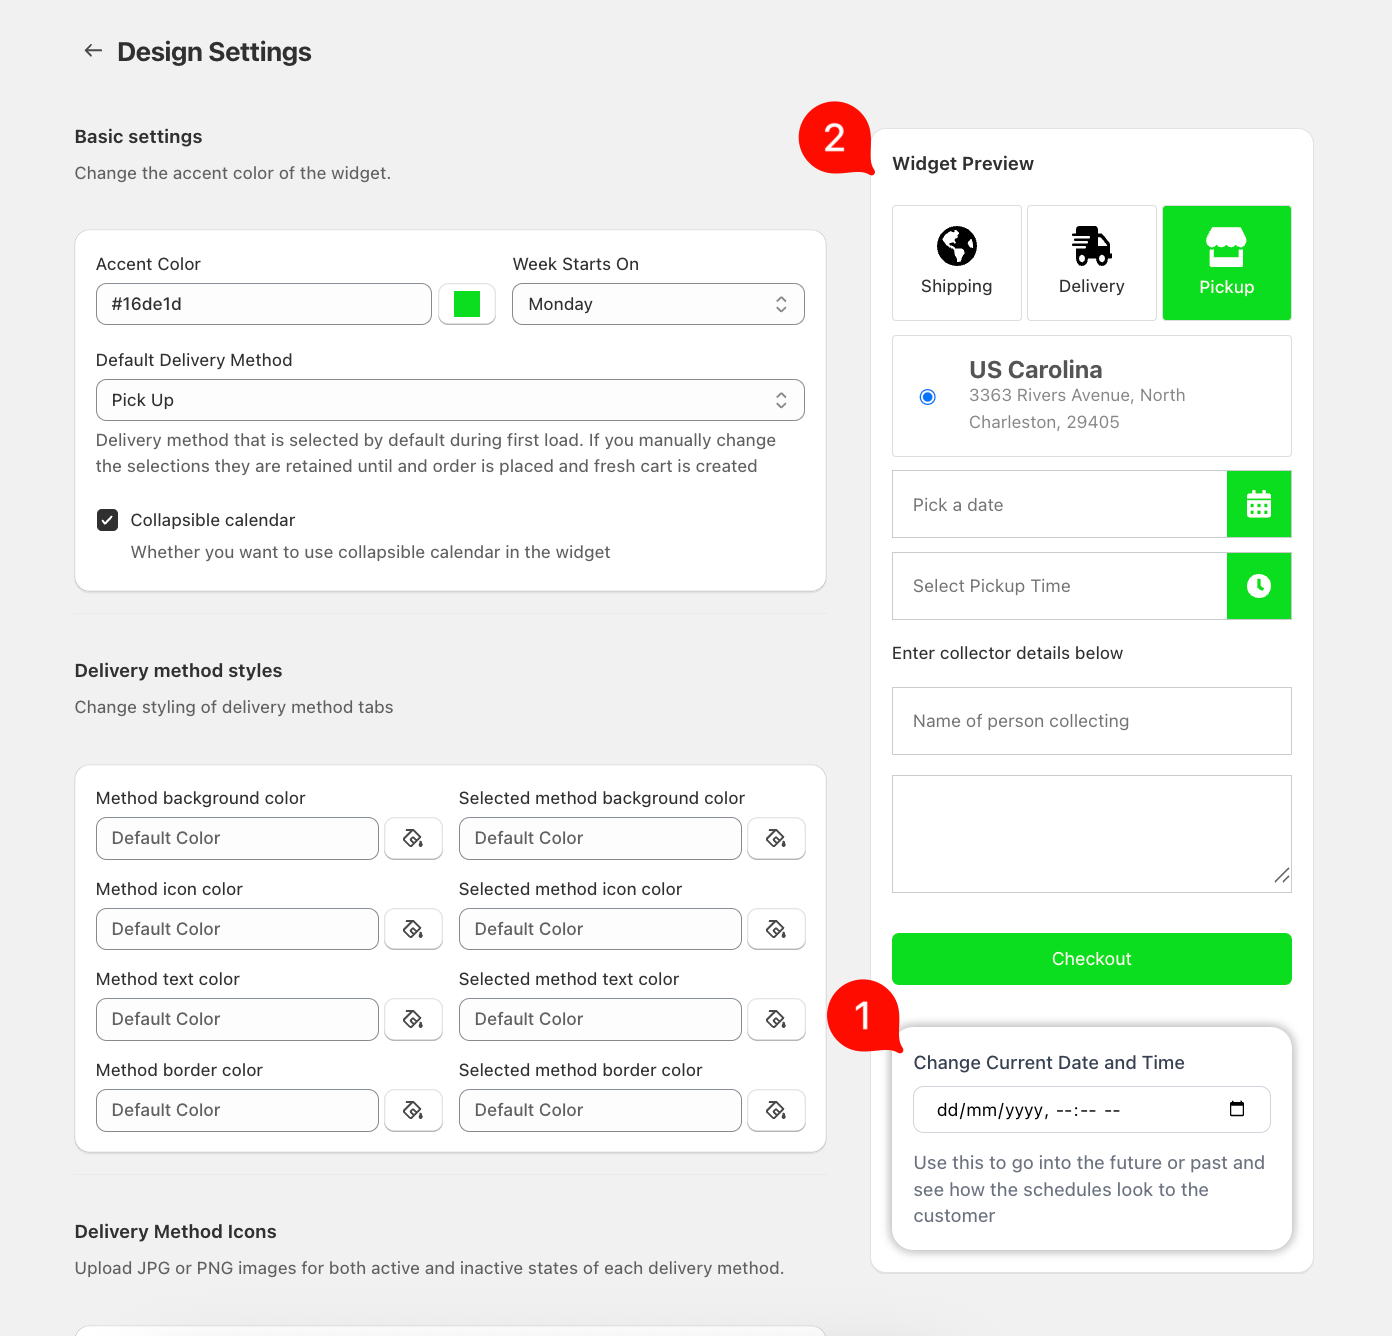
- See Widget Preview on the right
- Select Delivery method in the preview
- Simulate any date and time via Change Current Date and Time option
- Verify:
- Postal code validation works (enter valid/invalid codes)
- Time slots show correctly (if configured)
- Blocked dates are grayed out
- Preparation time is respected (earliest available date/time)
Note: Widget Preview simulates the customer experience. Use it to verify your settings before customers place orders.
Place a Test Order
Complete end-to-end verification by placing a test order.
Steps:
- Go to your store’s cart page
- Add products that have inventory at your delivery location
- Select Delivery method in the Bird widget
- Enter a valid postal code (if using postal code validation)
- Select date and time (if configured)
- Complete checkout
- Verify order appears in Shopify Admin > Orders with correct delivery details
📖 Detailed Guide: Verify Your Widget Setup: Place a Test Order - Complete test order verification steps
Related Articles
Was this article helpful?
Thanks for your feedback!